Navigation Tutorial
Lesson 2 - Compass Skills
All content copyright © Ashley Burke 2008. Not to be copied, duplicated or used for any purpose without permission.
Navigation Tutorial Lesson 2 - Compass Skills
All content copyright © Ashley Burke 2008. Not to be copied, duplicated or used for any purpose without permission. |
Navigation course by Ashley Burke
8. Navigating from point to point using map and compass
Let us imagine that right now you are at point A on the map shown in Figure 8.1 and that you know that this is your location. You want to get to point B. There is no trail or track between A and B and therefore you are going to have to use the map and compass to navigate there by yourself.
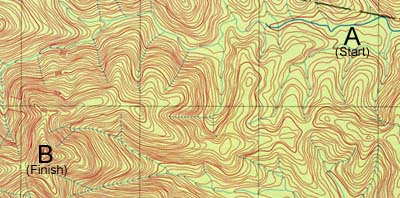
Fig 8.1
We are now going to work through the steps that you would use to accurately navigate your way from point A to B on the map in Figure 8.1 (above).
8.1 Step1 - Divide your route on the map into a series of bearings
The first step in the process of navigation is to study the map and decide upon a suitable route for you to follow to get from your starting point for your destination. Use the skills you learned in Sections 2, 3 and 4 to form a mental picture of the landscape by examining the map contours. Remember that your route should follow natural features such as ridges, spurs or water courses. Usually ridges and spurs are easier and safer to follow than creeks and gullies.
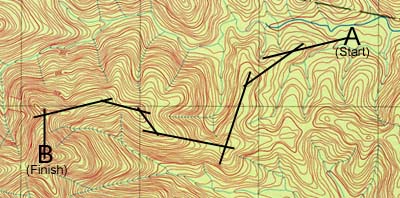
Once you've decided on what landforms you are going to follow to get to your destination, divide your route into a series of points joined by straight lines. By dividing your route into a series of straight lines, you are creating a series of bearings that you can then follow using your compass to reach your destination. After doing this for our journey from A to B we get something like Figure 8.2:
Fig 8.2
Notice that we have chosen a series of spurs and ridges as the landforms that we will follow to get from A to B. These landforms offer a series of natural features that connect A to B and thus by following these our task of navigation will be made much easier.
This step that we have just done is one of the keys to navigating! I cannot emphasise enough that good navigation depends on choosing a good set of bearings to get you from A to B! Whether or not you follow your bearings accurately is not important if the bearings are set poorly in the first place!
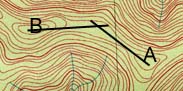
Let us pause for a moment and take a bit of a closer look at the art of choosing a good set of bearings for your route. There are common traps which lead to bad bearings being set. No matter how good you are at following your compass, if you have chosen a bearing wrongly, you will go the wrong way! Consider the example in Figure 8.3. Here we compare a good bearing with a bad one. In Figure 8.3 we want to go from A to B, and the easiest way to do this is to follow the ridge which joins them. But a single bearing going directly from A to B won't follow the ridge. Instead it will have you traversing obliquely across a slope, losing the ridge and not following the natural feature that links A to B. It is much better to use two bearings, one to the saddle and then another one from there to the next knoll.
 |
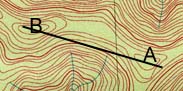 |
| Good bearing | Bad bearing |
Fig 8.3
Remember this: Your bearings should start and end at places where there is a noticeable change in the lie of the land. For example, the top of a hill, a bend in the ridge, a saddle, the edge of a flat area where the land begins to fall away or rise. Doing this will help you know when you have reached the end of your bearing and when it is time to change direction.
Ok, so we have now decided on the route we are going to take from A to B and have drawn a set of straight line bearings on the map as shown in Figure 8.2. Lets say that we are standing at point A right now. What we now need to do is set the compass so that we can use it to follow the first of these straight line bearings. We do that by following these next steps carefully.
First, place the compass on the map with the edge of the compass along the first bearing as shown in Figure 8.3.
Second, while keeping the edge of the compass in place we rotate the movable dial until the orienting arrow points to grid north on the map. You will see that when this is done the hairlines on the inside of the dial are aligned with the north-south grid lines of the map. See Figure 8.3.
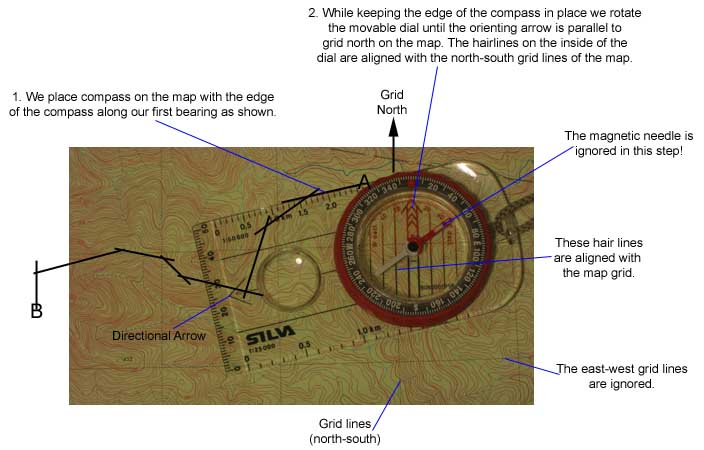
Fig 8.3
Here are some important things to look out for when doing this particular step.
Above all, remember that what you are doing in this step is determining your grid bearing from the map. That is, you are using your compass to measure the angle between grid north and the direction that you want to walk in. This angle will be a number between 0 and 360 degrees, clockwise from north. You can read this number from the compass dial. For the example we are using here this gives us a value of 257°. See Figure 8.4.

Fig 8.4
8.3 Step 3 - Subtract the grid to magnetic angle
Does your compass have an adjustable declination correction scale or an arrow that can be adjusted to set the declination? If so, you can skip this step. Instead, read the note about compasses with a declination scale in Appendix A.
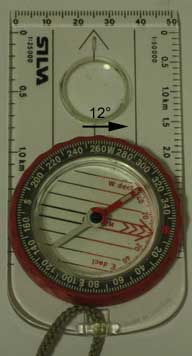
Remember from Section 6.1 that magnetic north is 12 degrees to the east of grid north. Our bearing of 257° that our compass is now set on is relative to grid north. That is, 257° is the angle between grid north and the direction we want to go in our example. Before we can use the compass to follow our bearing, we need to adjust for the difference between grid north and magnetic north. That is, we have to subtract 12° from our grid bearing. We do this by rotating the compass dial clockwise by 12°. You can take the compass away from the map to do this. The value of 12° is the difference between grid north and magnetic north in south eastern Australia. This value may be different in other parts of the world.
So, here's what we do:
See Figure 8.5 which shows this step.
BEFORE |
AFTER |
| Our compass is set on our grid bearing of 257°. We then rotate the dial clockwise by 12°. |
Once this has been done, our compass reads a new bearing of 245°. This is our magnetic bearing. |
 |
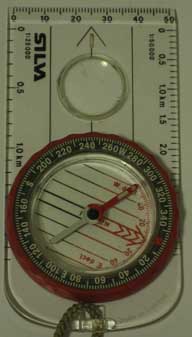 |
Fig 8.5
In this step we have again ignored the magnetic needle.
Our compass is now set.
8.4 Step 4 - Follow your bearing
Your compass is now set and you are ready to follow your bearing. Do not rotate the dial again until a new bearing needs to be set. We now use the magnetic needle for the first time. What we do is to hold the compass so that the magnetic needle floats over the orienting arrow, and when this is done the directional arrow points in the direction you need to walk in.
So, here's what we do:
Hold the compass horizontally so that the magnetic needle floats easily and does not rest on the surface of the dial that it is suspended in.
Ensure that the compass held away from metal objects or possible sources of interfering magnetic fields such as other compasses, mobile phones, digital cameras, etc.
Figure 8.6 shows a compass that is held on our bearing of 245°.

Fig. 8.6
8.5 Tips for following your bearing
Now that the compass is set and held right and you are following your bearing by going in the direction of the directional arrow, how do you go about doing this when off track in rough country when there may be all sorts of obstacles to overcome as you follow your bearing such as thickets of scrub, rocky ground, slippery rocks to avoid, mud to avoid, fallen logs to get around, or whatever? Here are some general tips.
Enjoy your walk
You go bushwalking for the joy of it, not to march along a set bearing regardless of what stands in the way. Your compass is a guide to the general direction that you should prevail in. Keep in that direction but be flexible enough to deviate around obstacles that lie in the path. You don't have to thrash through a thicket of dense scrub if you can go around it, even though the compass might be pointing straight into it. Make sure that if you do deviate around such obstacles, that you return to your original bearing once ahead of the obstacle. Don't make long detours and don't walk for long in a direction other than your bearing. Prevail in the direction of your bearing using your compass to guide you in that direction. Above all, enjoy the walk. That's what you're there for.
Let the land do the navigating
Remember Step 8.1. The bearing you chose should follow a natural landscape feature such as a ridge, a spur or a gully. Follow it. If your bearing was along a ridge then make sure you keep to the crest of the ridge and ensure that while so doing, that you remain on your bearing. If you find that by keeping along the ridge you are no longer following the bearing then that means it is time to check the map and compass again and possibly set a new bearing, starting at Step 8.2. The whole idea of choosing bearings that follow landscape features is so that you can use both the land and the compass to keep on track.
When to stop and change bearing?
If you chose good bearings in Step 8.1, then you will know when you are at the end of one bearing and the start of the next by the fact that you arrive at a noticeable change in the landscape. For example, you might arrive at the top of a knoll, or the ridge might change direction, or the slope you are climbing may flatten out, or you might reach the bottom of the hill. In such cases, were you to continue along your original bearing you might no longer be following the landscape feature that you have been following until now. This tells you that it is now time to change your bearing.
Let's take another look at the example we have been using in this chapter, in which we set out from our starting point A, following a magnetic bearing of 245°. How would we know when we are at point C (see Figure 8.7) which is where we need to change from our bearing of 245° to your next bearing? Take a look at Figure 8.7.
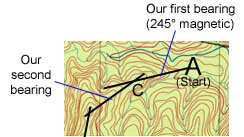
Fig 8.7
We can see from Figure 8.7 that as we follow our bearing from A heading towards C that we climb a spur. When we reach point C, the spur flattens out, we temporarily stop climbing and reach a level area. There may even be a very slight descent before it climbs again along our second bearing. In addition, when the spur resumes at the other end of the level area, it is more southerly than the spur between A and C. That is, we need to swing left a little when we reach the level area. Reaching the level area is our signal. When we are there we know we have reached the intersection of our first and our second bearing. Now we must stop, have a look at the map and reset the compass along our second bearing by following Steps 8.2, 8.3 and 8.4.
Some navigation schools teach you to count your paces as a means of determining when you have reached the end of your bearing. This is generally a waste of time when navigating in the manner described in this course.
Keep your eyes open
Look around you as you walk. Correlate the landscape features that you see around you with the map. In the next section you'll learn other ways of identifying features around you and working out your location using your compass.
The skills you have learnt in this section are the core skills of navigation. This is what navigation is all about. An experienced navigator may repeat the steps described in Sections 8.1 - 8.4 dozens of times a day when navigating through the bush. Essentially navigation is about point to point navigation from a starting point to a final destination in the manner described in this section.
What we will learn in the remainder of this course are additional skills that are useful to supplement the skills described in this section. These are skills to help you identify features around you and to work out your location. Click Next to continue.
Web page created 12 Jul 2008, last updated 23 Dec 2014. All content copyright © Ashley Burke 2008. Not to be copied, duplicated or used for any purpose without permission. |