Navigation Tutorial
Lesson 3 - Additional Techniques
All content copyright © Ashley Burke 2008. Not to be copied, duplicated or used for any purpose without permission.
Navigation Tutorial Lesson 3 - Additional Techniques
All content copyright © Ashley Burke 2008. Not to be copied, duplicated or used for any purpose without permission. |
Navigation course by Ashley Burke
Working out where you are is a skill which ties together everything you have learned about navigation, and your experience. This is where your experience will help you, as will your memory of the terrain you have passed through, how frequently you have been cross-checking your location against the map, and so on. There are many techniques that you will use for working out your position, and one of these is to reverse the logic that I described in Section 9. I will go through this logic with you shortly, but first I'd like to describe one or two other tips and techniques for working out your position. There are many more, but most of these are a matter of applying the basic map reading and compass skills outlined in this course, along with practise, practise and more practise.
Study the map and use deductive logic to work out your position by a process of elimination. For example, look at the map and then think like this:
Think back to when you last knew with high certainty where you were. Then think about the country that you walked through since that point and what bearings you followed between then and now. This should narrow down your position to a relatively small area on the map. Then you can use deductive reasoning to narrow down the possibilities further.
10.3 Move to a recognisable point
If you're unsure of your location, then perhaps there is a prominent feature not far away that is easier to identify. Provided it is visible, not far away, and easy to get to, then it might be easier to go there and then work out where you are from there. Such a feature might be the top of a hill, crest of a ridge, sharp bend in a river, shore of a lake, or anything that has a view and is recognisable. Then the number of possible matching features on the map will be fewer than if you were in featureless open country, which could quite literally be anywhere.
10.4 Using your compass to work out your location
If you can recognise a distant object, such as a mountain, and can identify that object on the map, then you can use your compass to work out where you are from it, by reversing the logic that I described in Section 9. I'll run through that logic with you now, to illustrate how this is done. This technique is only useful if you can identify one or more distant objects. In poor weather, or at times when your view of the surrounding country is obscured, then you can't use this technique and you'll have to resort to other methods.
Let's assume that you're walking through the bush and are unsure of your location. To work out where you are, you decide to move to somewhere with a view of the surrounding area. When you get there, you recognise a peak and can identify that peak on the map. Now you can use the following technique to work out where you are.
Step 1 - Get the magnetic bearing of the feature from your location
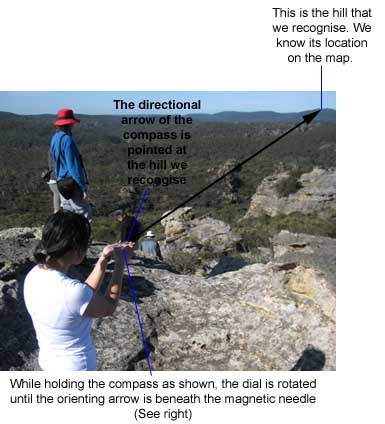
We need to get the magnetic bearing of the straight line between you and the feature that you recognised. Do this:
Figure 10.1 shows a navigator in the process of carrying out this technique.
 |
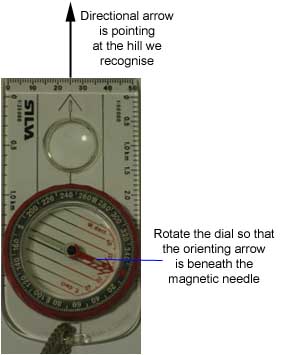 |
Fig 10.1
Step 2 - Add the grid to magnetic angle
When Step 1 is done we have a magnetic bearing from our current location to the feature we recognise. Before we can use this to work out our position we need to convert this to a grid bearing. To do this, we add the grid to magnetic angle. That is, we rotate the compass dial anticlockwise by 12°.
Note: If your compass has a separate declination scale inside the dial and if this has been set correctly to 12° east of North then you can omit this step.
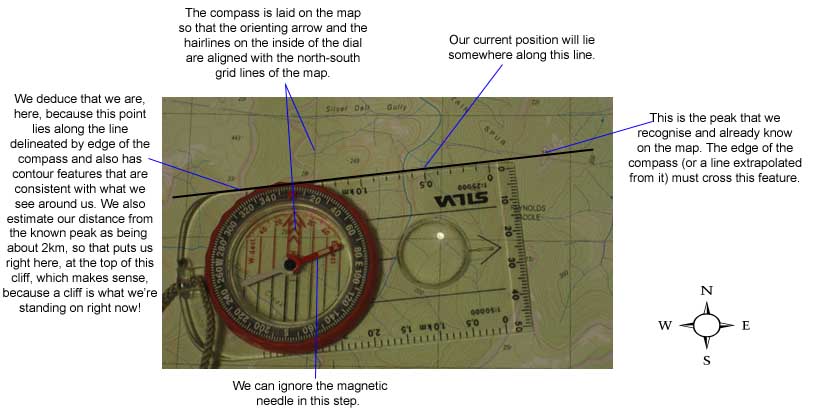
Step 3 - Line up the compass on the map
Now we place the compass on the map in such a way that ALL of the following are simultaneously true:
See Figure 10.2 for an example showing the compass correctly positioned on the map.
Step 4 - Rule a line and deduce your location
Without moving the compass after correctly positioning it in Step 3 , rule a line along the edge of the compass that crosses the recognised feature. Now you can take the compass away from the map if you wish.
Your location is somewhere along this line. You should now be able to work out your position by studying the map along the ruled line. Make an estimate of how far away from you the recognised peak is, and look on the region of the map that is that distance along your ruled line. Study the map contours and correlate these with what you see as you look around you. You should now be able to identify it on the map. See Figure 10.2 for an example.
Fig 10.2
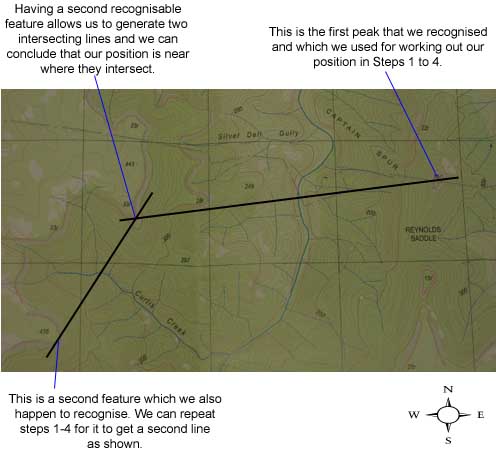
Sometimes you might recognise more than one peak around you. If so, you can repeat this procedure for the second peak to give you a second line on the map. Your location is in the vicinity of where the lines intersect. Figure 10.3 shows the map after having repeated Steps 1-4 for the second peak.
Fig 10.3
What you have just learned and what is shown in Figure 10.3 is approaching what is known as a resection. That is, in Figure 10.3 you have used two known points to derive your location as being the intersection of the bearings of each of those points from your current position. If you have three or more points, then this is called a resection, or triangulation. Figure 10.4 shows a full 3-point resection.
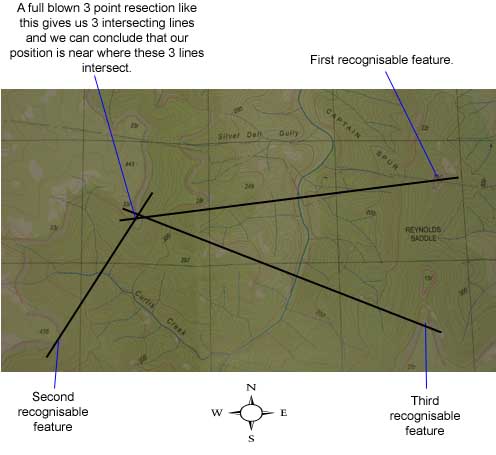
Figure 10.4
Although the resection is a commonly taught method in some schools of navigation, the technique of performing a full 3 point resection is rarely of any use in real situations that bushwalkers would normally find themselves in. In my personal experience I have only ever needed to perform a full 3-point resection once in my life. To see why a resection is rarely applicable in real life, consider the following:
Rather than attempting to perform a resection to determine your position it is usually far more practicable to use a single bearing on one known object and combine that with deductive reasoning and scrutiny of the map using the procedure described in Section 10.4. There are a few other techniques that you can use to work out your position when you have a more limited field of view, and I will briefly mention these in the next section.
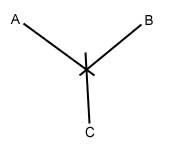
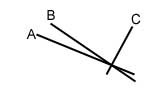
| In this example I show three resections, in which your position is triangulated from three known points A, B and C. These diagrams illustrate that the resection is more prone to be inaccurate if two or more of the points A, B or C are either too close together or too far apart, causing the lines to be nearer to parallel, which results in the resection being more prone to inaccuracy. | ||
 |
 |
|
Here in our first example is an ideal resection, where the 3 points A, B and C are roughly equally spaced in a 360° field of vision. Obviously the likelihood of you being able to produce such a resection just when you need to is minimal. |
In our second example, A and B are close together. Any small inaccuracy in your bearings taken of either A or B causes a disproportionately large difference in the point on the map where these two lines meet. In this case you rely on your bearing from C and look at where it intersects the lines from A and B. This is therefore little better than the 2 point method shown in Figure 10.3. | In our third example, A and C are almost in opposite directions from where you are standing. Any small inaccuracy in your bearings taken of either A or C causes a disproportionately large difference in the point on the map where these two lines meet. You therefore rely on your bearing from B to determine where along the line between A and C you are located. |
Figure 10.5
10.6 Working out where you are when visibility is limited
One of the most difficult aspects of navigation is working out where you are when your view of the surrounding country is obscured causing you to be limited in the extent to which you can validate your position using the methods so far described. Examples of these difficult situations are when the weather closes in around you, when you are in dense forest or scrub, or when you are in close country where the terrain in your immediate vicinity obscures your view of the surrounding area. By far the most difficult environment of all to navigate in is when skiing or mountaineering in white-out. That is, when there is complete snow cover and you become enveloped in dense cloud. When this happens everything around you is completely white and it is impossible to even distinguish where the ground ends and the air begins. Your only sense of the lie of the land in these situations is where is downhill and where is uphill. Such circumstances are common when cross country ski touring or mountaineering and it is at times like this when navigation requires all your skills, experience and concentration, and even then it is easy to go astray and lose your way. In some cases it may be prudent judgement to stay put and setup camp rather than moving around with no certainty in your position, which can in turn lead you further astray and into further trouble.
Having said this, it is still possible to navigate in such conditions and there are a few techniques that you can use to help you find your way. Ultimately in these conditions safety is your first priority and you should use careful judgement when attempting to move in these conditions. Do not set out from a point of safety in such conditions. Rather, wait until conditions improve before venturing out. These tips are only intended for when you are caught out in such conditions and you have no other way of getting to safety. As previously stated, consider staying put until conditions improve if you have the necessary equipment and supplies for doing so.
Ok, let's assume the worst case, that you are caught in complete white-out in a snowscape and have no visibility and that you do not have the option of staying put. Let's also assume that modern electronic navigation aids such as a GPS are unavailable. Under such circumstances, the only resources available to you are your map, your compass, and your sense of where is uphill and where is downhill. It is this latter sense in conjunction with your map and compass that you will have to rely upon.
Tip 1: Go Straight and Remember Everything
Let's say that if you keep heading south you'll eventually come to a road which will take you to safety. Set your compass on a south bearing and head steadily in that direction, keeping as closely as possible to the bearing without deviating. Then pay careful attention to whether you are climbing and descending and how steeply. Remember every change in steepness in the terrain you are walking through whilst keeping to that bearing. Now study the map carefully. Look along an imaginary line on the map that represents the bearing that you are following. Study the contours along that line and see how well they fit with your mental picture of the ups and downs that you have been experiencing. You may be able to narrow down your position on the map based on what areas of the map have contours that match what you've been doing.
For example, as you head south, you might find that you climb steeply, then level out, then drop gently, then climb to the crest of a ridge. Study the map and see if you can find this sequence of terrain in a line going from north to south.
Tip 2: Take Uphill / Downhill Bearings
If you can't see a thing, then at least you'll still have a sense of where is uphill and where is downhill. With your compass take a bearing directly uphill or downhill from where you're standing. Add the magnetic angle and then line up your compass on the map. Look for slopes on the map which slope in the same direction as your correctly aligned compass. This will help narrow down to position to a relatively small number of possibilities.
Note that for this technique to work you must establish that your sense of where is uphill and where is downhill is accurate and the slope you are on is consistent over a large enough area to show up on the map. For example, don't use this technique when standing on the side of a small irregularity in the side of a hill. Move around a bit to get a profile of the overall direction of the slope before concluding what the uphill / downhill bearing should be.
Tip 3: Take Contour Bearings
If you have a sense of where is uphill and where is downhill then you should also have a sense of what direction you can move without going either up or down. That is, what direction would you walk or ski in so that you would be going neither uphill nor downhill but instead would be traversing sideways across a slope? If you move along a bit, neither climbing nor descending, you will be able to set your compass on a bearing that represents this direction. Add the magnetic angle and then line up your compass on the map. Look for contours lines on the map that are parallel to your correctly aligned compass. Your position should be somewhere on the map where the contours go in the same direction as your correctly aligned compass.
Obviously these techniques don't work very well if you are in featureless dead flat terrain with zero visibility. In such situations your only options are either to stay put, or set a bearing in the direction of safety and to go for it.
Web page created 12 Jul 2008, last updated 23 Dec 2014. All content copyright © Ashley Burke 2008. Not to be copied, duplicated or used for any purpose without permission. |